Tutorial: Floating Tiered Side Card
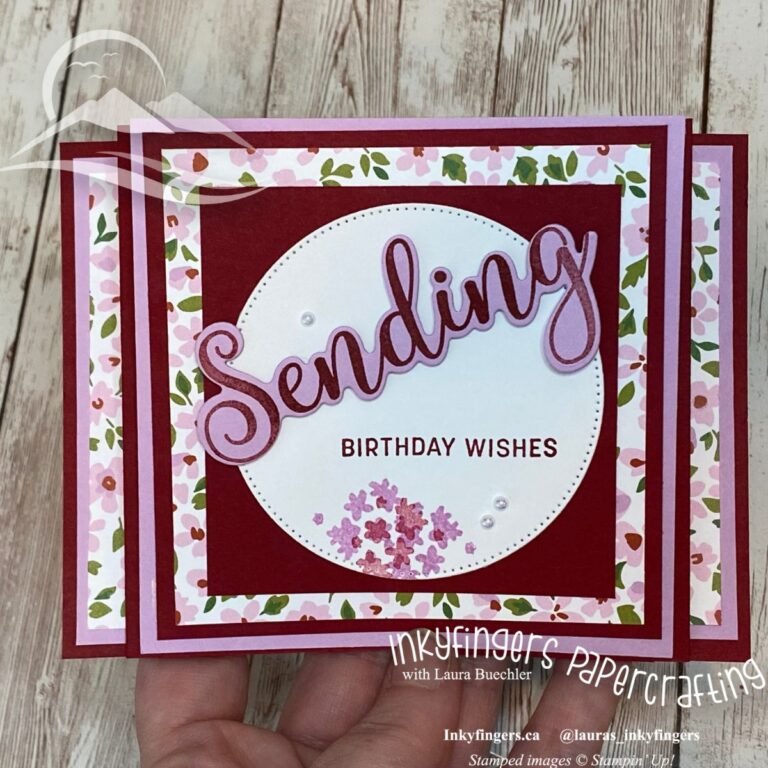
Hello Stampers! I’ve got a terrific tutorial to share with you today, for a fabulous fancy fold card. This project was shared at one of our recent Zoom Stamping sessions by teammate Jaime, and then another teammate, Arvon, figured out how to re-size it so it could be made with our beautiful 6 x 6″ Designer Series Paper. The original card Jaime showed us how to make was 5 x 7″, and the new redesign by Arvon measures 4 ½ x 5 ½”!
(By the way, we’d love to see you at our next Zoom Stamping session! They take place every second Tuesday, you get to use your own supplies, and the event is totally free and open to everyone! Get all the details right here!)
Now, on to the card! You will need two different colours of cardstock. Here are the measurements for Cardstock #1:
Cardstock 1:
5 ½ x 6”
4 ¼ x 6”
3 x 6”
1 ¾ x 4 ½”

And, the measurements for Cardstock #2:
5 ¼ x 4”
4 x 4”
2 ¾ x 4”
1 ½ x 4 ¼”

Finally, you’ll need the following pieces of Designer Series Paper:
5 x 3 ¾”
3 ¾ x 3 ¾”
2 ½ x 3 ¾”
1 ¼ x 4”

For the inside, a piece of Basic White cardstock, 3 ¼ x 3 ¼”. A contrasting mat for this piece measures 3 ½ x 3 ½”.

Mat your pieces of Designer Series Paper on the corresponding pieces of Cardstock #2, and set aside. Also set aside the smallest piece of Cardstock #1.

With each of the three remaining pieces of Cardstock #1, follow these steps:
Score parallel to the short side at ½” and at 1 ½”.

On the left side of the cardstock, where the ½” scoreline is, mark at 1 ½” down from the top. Trim off the corner as shown in the photo below; you can mark with a pencil and use your snips, or line it up in your trimmer.

Apply Tear and Tape to the small panel between the edge and the scoreline, as shown below.

Attach the matted piece of Designer Series Paper to the card panel. Note that the borders around the top, bottom, and right side will be even, with a bit of extra space on the left side.

Stamp your desired images and sentiment on the white cardstock insert. Mat with contrasting cardstock and attach to largest panel.

Once you have completed these steps for all three of the Cardstock #1 panels, it’s time to put the card together! Starting with the largest panel, peel off the backing from the Tear and Tape, and lay the next-largest panel on top to attach it. Repeat with all four pieces to complete the card. Embellish as desired.

Do you love the look of those daisies? The new Cheerful Daisies bundle offers so many beautiful options for creating them! I’d love to show you how to use them at the upcoming Virtual Stampin’ Retreat. Get all the details here!
Happy Stampin’!



Laura, thank you for your great tutorial! I must it try!
the card is gorgeous!
sending hugs
Regina
Thank you so very much for resizing this card!
So glad you like it, Liz! xo